
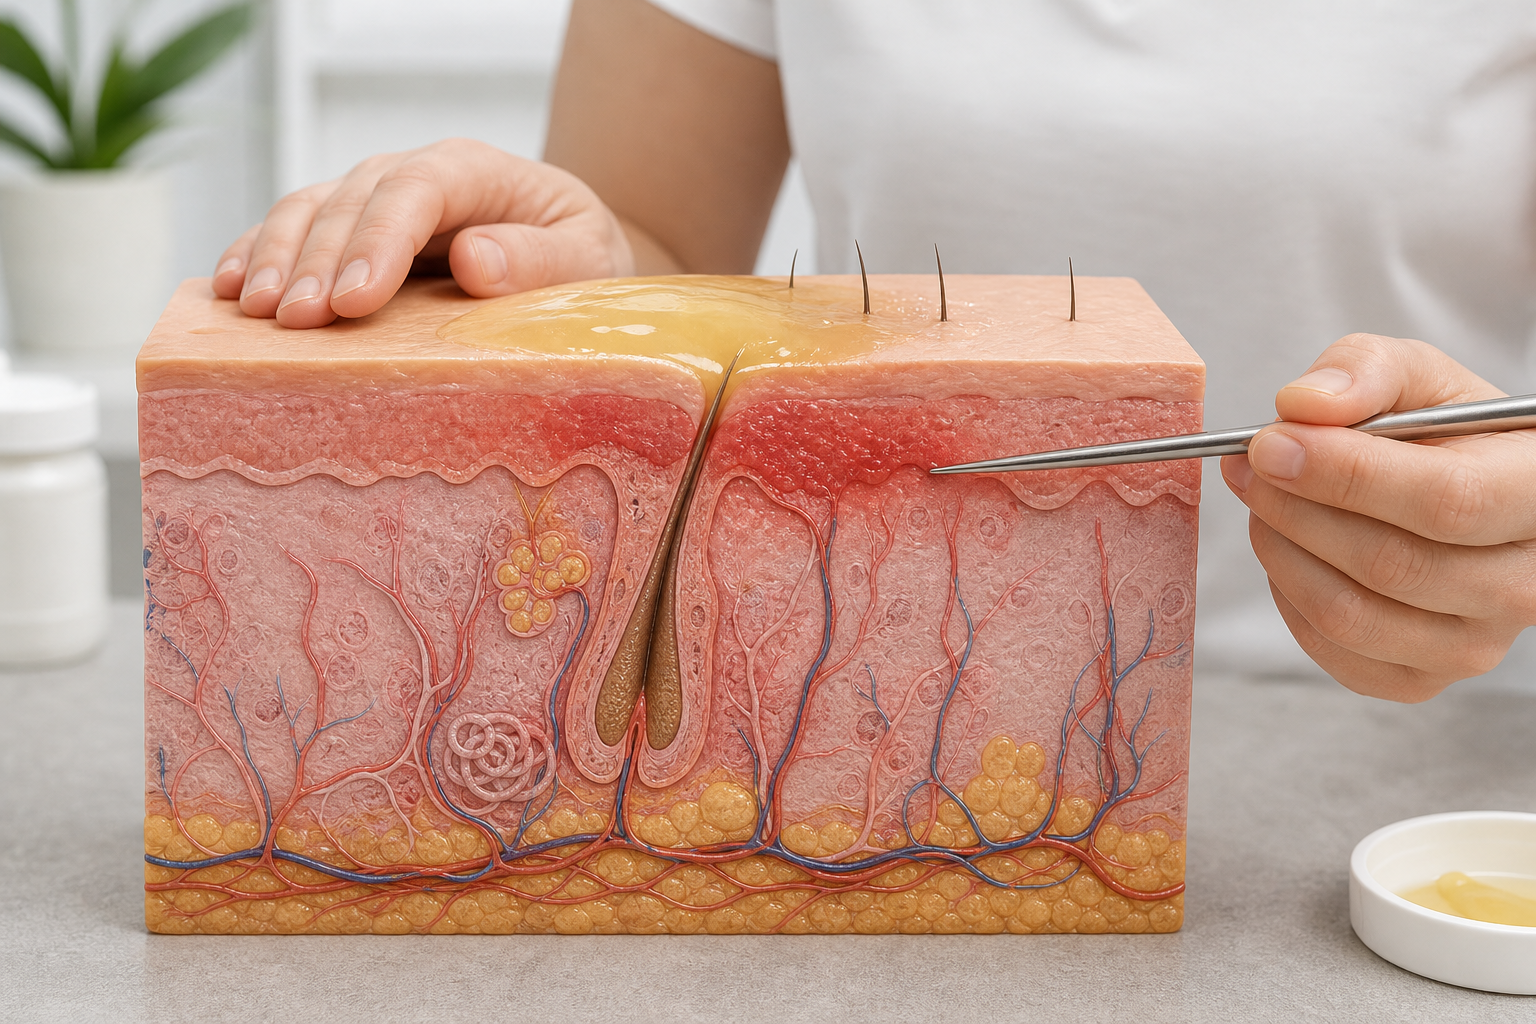

A wax burn can happen quickly — overheated wax, a double pass with a strip, or skin that was more sensitive than expected. Whether the result is redness, raw skin, or a blister, knowing the right wax burn treatment steps in the first few minutes can meaningfully reduce pain, lower the risk of infection, and improve how the skin heals over the following days. This guide explains how to assess the injury, what to apply, what to avoid, and when professional medical attention is genuinely necessary.
Key Takeaways
- Not all waxing injuries are the same — a thermal burn from overheated wax and skin lifting from mechanical adhesion require slightly different immediate responses.
- Cool running water for up to 20 minutes is the most important first step for a heat-related wax burn; do not apply ice directly to the skin.
- Pure aloe vera gel, fragrance-free moisturizer, and antibiotic ointment are appropriate for most superficial wax burns; butter, toothpaste, and oils are not.
- Post-inflammatory hyperpigmentation (PIH) is a common complication, particularly on the face and bikini area, and requires consistent sun protection to prevent worsening.
- Blistering, signs of infection, or a burn that has not improved within one to two weeks warrants assessment by a medical professional.
Thermal Burn vs. Skin Lifting: Understanding the Difference
Most people use the term “wax burn” to describe any skin injury from waxing, but there are two distinct mechanisms involved, and distinguishing between them helps guide the right response. A thermal burn occurs when wax is applied at too high a temperature, transferring heat directly into the skin. A skin lifting injury — sometimes called an epidermal avulsion — is a mechanical injury caused by the adhesive strip pulling away the outermost layer of skin rather than just the hair. Both can look similar immediately after the event, but their causes and optimal first-aid responses differ slightly.
Thermal burns from waxing are typically classified as first-degree burns, affecting only the outer layer of skin (the epidermis). They present as redness, warmth, and mild swelling, and usually begin to peel within two to four days. A more significant thermal injury — a second-degree burn — involves blistering, a shiny or weeping surface, and deeper tissue damage. This is less common with professional waxing but can occur with unregulated at-home wax warmers or when wax is reheated multiple times. Skin lifting from waxing, by contrast, leaves a raw, pink, or abraded patch that may not blister but can be equally painful and prone to infection if not managed correctly. Because skin lifting is a barrier disruption rather than a heat injury, cooling with water is less critical; the priority is protecting the exposed skin surface.
How to Assess Burn Severity Before Treating
Before beginning any wax burn treatment, take a moment to assess what you are dealing with. The severity of the injury determines how urgently you need to act and whether home care is appropriate.
| Injury Type | Appearance | Symptoms | Typical Healing Time |
|---|---|---|---|
| Normal post-wax redness | Uniform pink flush, no broken skin | Mild warmth, slight sensitivity | 30 minutes to a few hours |
| First-degree burn (superficial) | Redness, dry surface, possible peeling after 2–3 days | Stinging, warmth, tenderness | 3–7 days |
| Skin lifting (epidermal avulsion) | Raw, pink or red abraded patch, no blister | Sharp pain, sensitivity to touch | 5–10 days |
| Second-degree burn | Blistering, shiny or weeping surface | Intense pain, swelling | 2–4 weeks; medical review advised |
If the affected area is larger than the palm of your hand, involves blistering, is located on the face near the eyes, or is on a joint or the genital area, seek medical assessment rather than attempting home treatment alone.
Step-by-Step Wax Burn Treatment
The following steps apply primarily to superficial thermal burns and minor skin lifting injuries. For more severe injuries, these steps may provide temporary comfort while you arrange medical care, but they are not a substitute for professional assessment.
Step 1: Stop Waxing Immediately
Do not continue waxing over or near the affected area. Applying more wax to already-damaged skin will worsen the injury and significantly increase the risk of infection and scarring. If wax residue remains on the skin, do not attempt to pull it off dry.
Step 2: Cool the Skin (Thermal Burns)
For a heat-related burn, hold the area under cool running water for 10 to 20 minutes. Cool water — not cold, and not ice — is the most effective way to draw heat out of the tissue and reduce ongoing thermal damage. Do not apply ice directly to the skin; direct ice contact can cause frostbite on already-compromised skin and may worsen the injury. A cool, damp cloth held gently against the area is an acceptable alternative if running water is not practical. For skin lifting injuries, cooling is less critical; focus instead on protecting the raw surface.
Step 3: Remove Wax Residue Gently
Once the skin has been cooled, any remaining wax residue should be removed carefully. Apply a small amount of petroleum jelly or a fragrance-free oil to the wax residue and use a soft gauze pad to gently lift it away. Do not rub or scrub. Avoid using wax remover products that contain alcohol or fragrance on broken or irritated skin, as these will cause additional stinging and may delay healing.
Step 4: Apply an Appropriate Soothing Agent
Pure aloe vera gel — ideally 100% aloe with no added fragrance, alcohol, or colorants — is one of the most well-supported topical options for soothing minor burns. Aloe vera has demonstrated anti-inflammatory and wound-supportive properties in clinical literature and is widely recommended for superficial thermal injuries. Apply a thin layer to the affected area and allow it to absorb. For skin lifting injuries where the surface is raw, a thin layer of antibiotic ointment such as Bacitracin or a fragrance-free barrier ointment such as Aquaphor may be more appropriate, as these help maintain a moist wound environment and reduce infection risk.
Step 5: Cover the Area if Needed
If the burn is in an area subject to friction from clothing — such as the bikini line or underarms — cover it loosely with a sterile non-stick dressing or gauze. Avoid adhesive bandages directly on broken skin where possible, as removing them can cause further epidermal disruption. Change the dressing once or twice daily, or whenever it becomes wet or soiled.
Step 6: Manage Discomfort
Over-the-counter pain relievers such as ibuprofen or acetaminophen can help manage pain and reduce inflammation in the hours following a wax burn. Follow the dosage instructions on the packaging and consult a pharmacist or doctor if you have any conditions that affect which pain relief options are suitable for you.
What Not to Put on a Wax Burn
Several commonly suggested home remedies can make a wax burn significantly worse. The following should be avoided on any waxing injury.
- Ice or ice packs applied directly: Ice causes vasoconstriction and can damage already-compromised skin. Always wrap ice in a cloth and limit contact, or use cool water instead.
- Butter or cooking oils: These trap heat in the tissue, create an environment that promotes bacterial growth, and do not have wound-healing properties.
- Toothpaste: A persistent myth. Toothpaste contains abrasives, menthol, and fluoride compounds that can irritate broken skin and increase the risk of contact dermatitis.
- Alcohol-based products: Rubbing alcohol, toners, or astringents will sting, dry out the wound, and delay healing.
- Exfoliating products: AHAs, BHAs, and physical scrubs should not be used on or near a burn until the skin has fully healed.
- Makeup or concealer: Applying makeup over a wax burn introduces bacteria and occludes the wound. Wait until the skin has fully re-epithelialized before applying any cosmetics to the area.
- Retinoids: Tretinoin, adapalene, retinol, and similar vitamin A derivatives thin the skin and impair barrier function. They should not be applied to a healing burn and should be paused in the surrounding area.
Hair Removal Burn Aftercare: The Healing Phase
Effective hair removal burn aftercare extends well beyond the first few hours. How you manage the skin over the following days has a significant impact on healing speed and the likelihood of lasting marks.
During days two through seven, superficial burns typically begin to peel as the damaged outer skin cells shed. It is important not to pick or peel this skin manually. Premature removal of peeling skin disrupts the new epithelium forming underneath, increases infection risk, and raises the likelihood of post-inflammatory hyperpigmentation and, in more significant injuries, hypertrophic scarring. Keep the area moisturized with a fragrance-free moisturizer or barrier ointment to support the skin’s natural repair process and reduce the urge to pick.
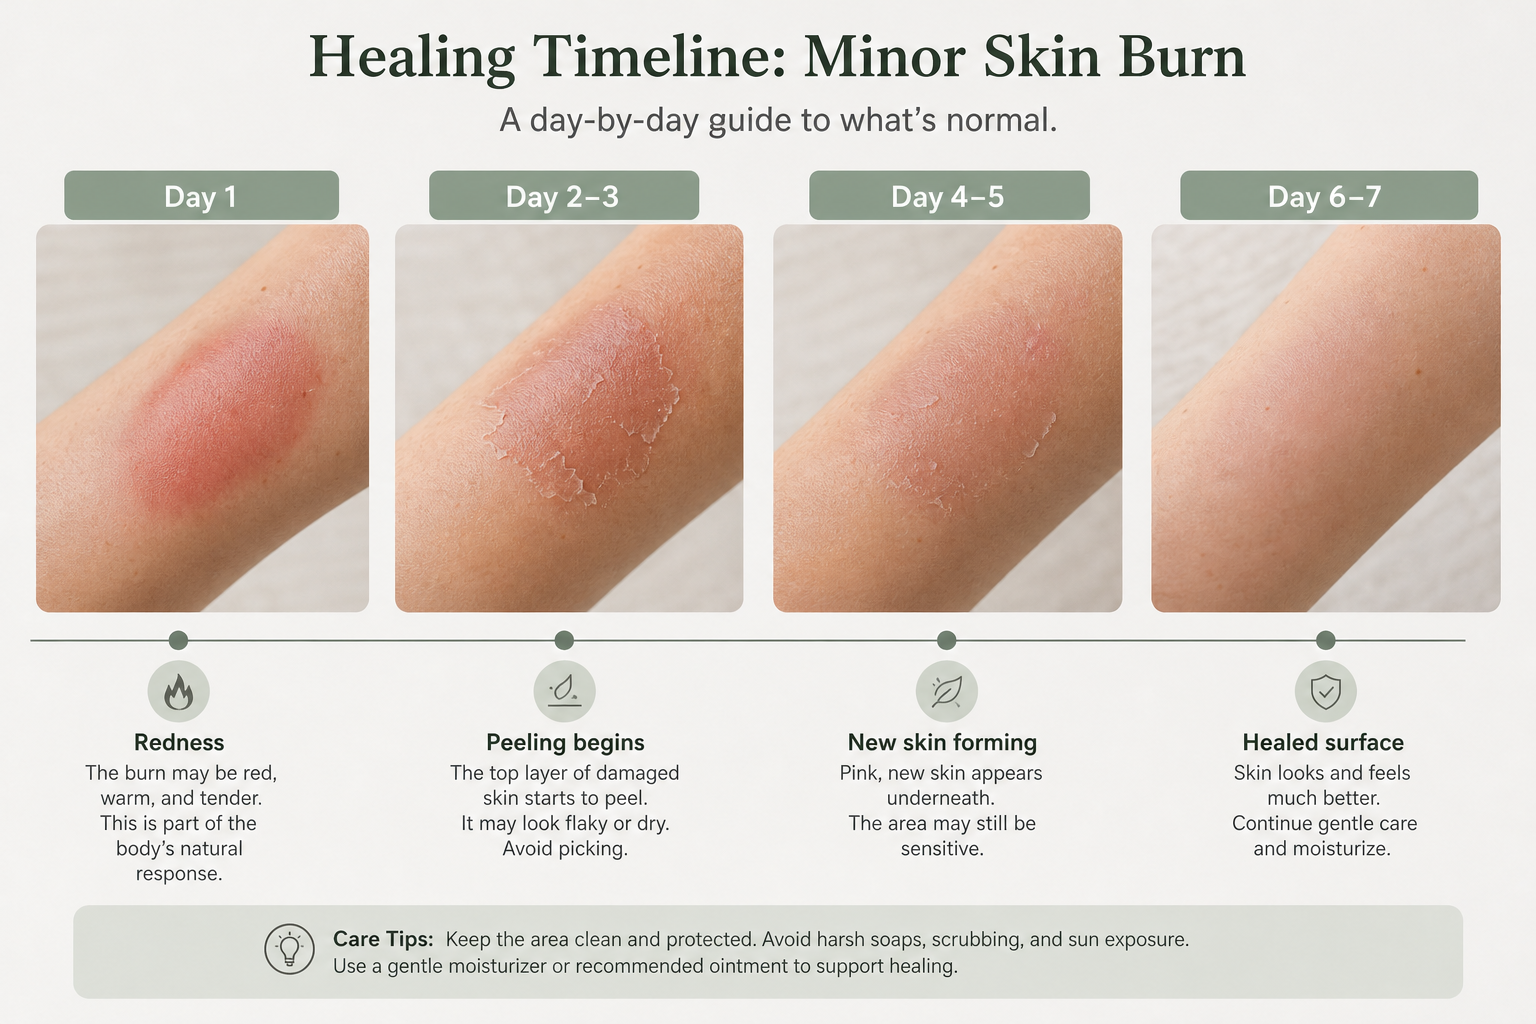
Sun exposure is one of the most significant factors that can worsen the outcome of a wax burn. UV radiation stimulates melanin production in already-inflamed skin, which can deepen and prolong any resulting dark marks. Keep the affected area covered or apply a broad-spectrum SPF 30 or higher sunscreen once the skin surface has closed. This is particularly important for the face, bikini area, and any area with darker baseline pigmentation.
Post-Inflammatory Hyperpigmentation After Waxing
Post-inflammatory hyperpigmentation (PIH) is one of the most common and frustrating complications of wax burns, particularly on the face, bikini line, and underarms. PIH occurs when the inflammatory response triggered by the burn stimulates excess melanin production, leaving a dark patch or mark after the wound itself has healed. It is not a scar in the structural sense, but it can persist for months if not managed appropriately.
People with Fitzpatrick skin types III through VI — medium to darker skin tones — are at significantly higher risk of developing PIH after any inflammatory skin injury, including wax burns. This is an important consideration that is often absent from general waxing advice. For these individuals, sun protection is not optional; it is the single most important step in preventing PIH from deepening.
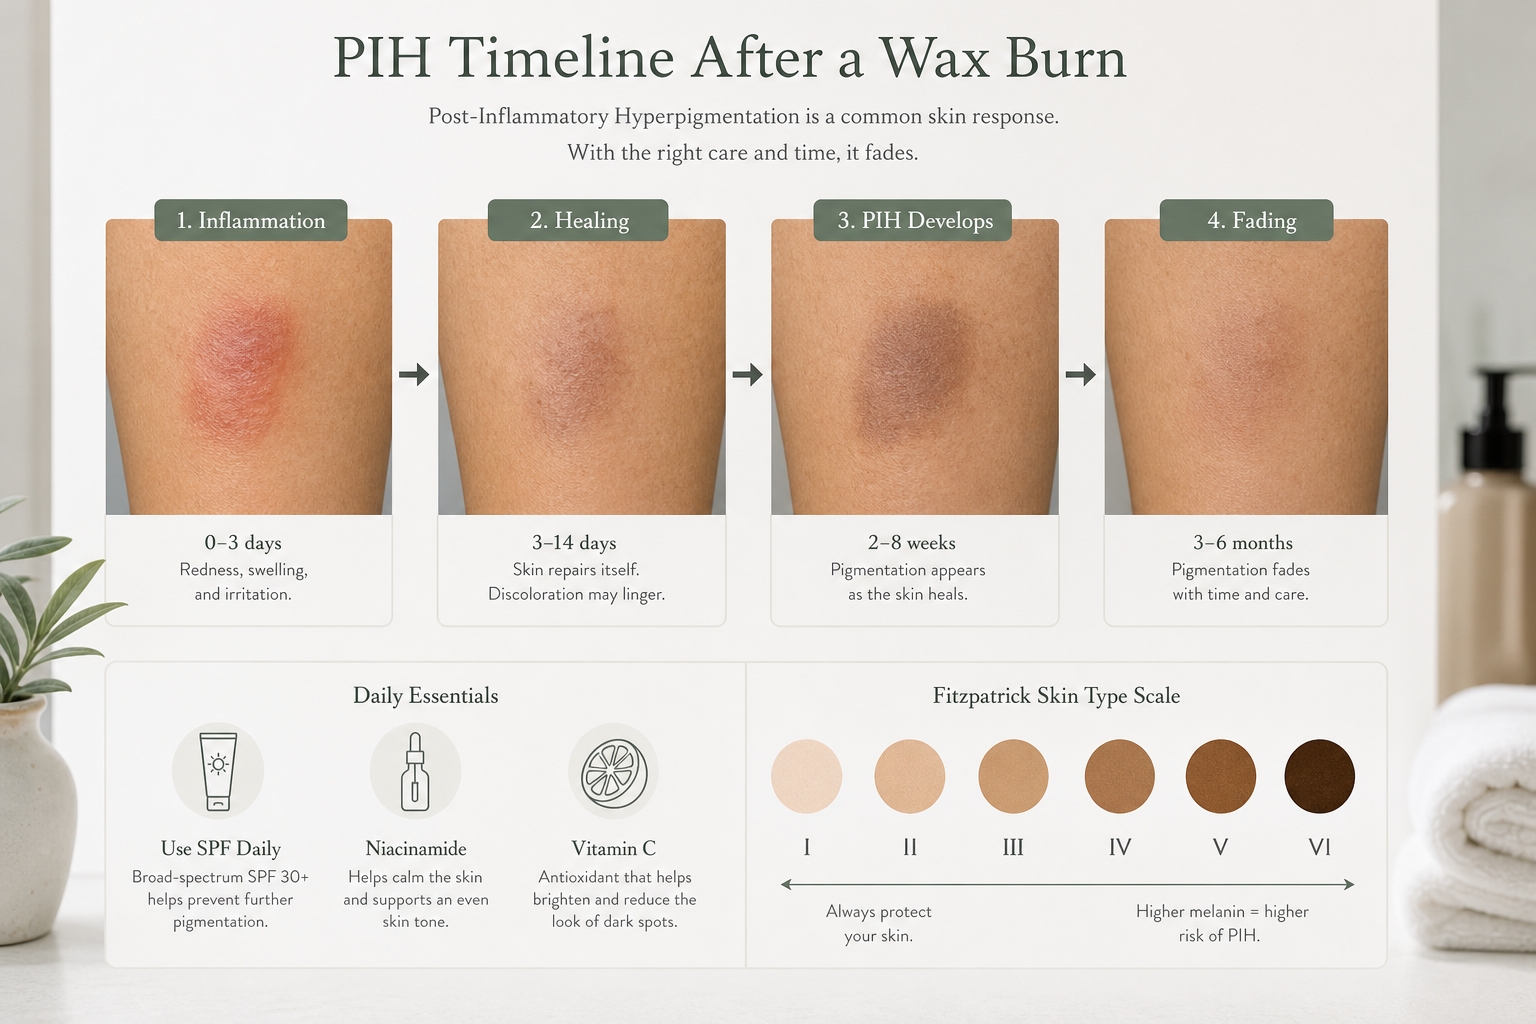
Mild PIH from a superficial wax burn may fade naturally over three to six months with consistent sun protection alone. For more persistent marks, topical brightening ingredients such as niacinamide, vitamin C, and azelaic acid may help support an even skin tone over time. These should only be introduced once the skin has fully healed — typically after two to three weeks for a minor burn. If dark marks are not fading after three to four months, or if they are in a visible area such as the face, a consultation with a dermatologist is worthwhile. Professional options such as topical hydroquinone, chemical peels, or laser treatments may be appropriate depending on skin type and the extent of the pigmentation.
Body Area Risk: Where Burns and PIH Are Most Likely
The risk of a wax burn and its consequences varies considerably depending on where on the body waxing takes place. Understanding this can help set realistic expectations and guide aftercare priorities.
| Body Area | Burn Risk | PIH Risk | Notes |
|---|---|---|---|
| Face (upper lip, brows, chin) | High | High | Thinnest skin; retinoid use common; most visible area |
| Bikini / Brazilian | High | High | Sensitive skin; friction from clothing; high PIH risk in darker skin tones |
| Underarms | Moderate | Moderate | Skin folds increase contact time; deodorant use can irritate healing skin |
| Legs | Lower | Lower | Thicker skin; larger surface area reduces concentration of heat |
| Arms | Lower | Lower | Generally well-tolerated; lower melanocyte density in many skin types |
Waxing Contraindications: Medications and Ingredients That Increase Risk
Several medications and topical ingredients significantly increase the likelihood of a wax burn or skin lifting injury. Understanding these waxing contraindications is essential for anyone considering hair removal, whether at home or in a salon.
Retinoids — including prescription tretinoin, adapalene, and over-the-counter retinol — thin the stratum corneum and impair the skin’s barrier function. Waxing over skin that has been recently treated with retinoids dramatically increases the risk of skin lifting and epidermal avulsion. Most professional guidelines recommend pausing retinoid use for five to seven days before waxing, though some practitioners advise longer depending on the strength of the product being used.
Isotretinoin (Accutane) is a systemic retinoid used for acne that affects skin fragility throughout the body. Waxing is generally contraindicated during isotretinoin treatment and for a minimum of six to twelve months after completing a course, as the skin remains fragile and prone to injury well beyond the treatment period.
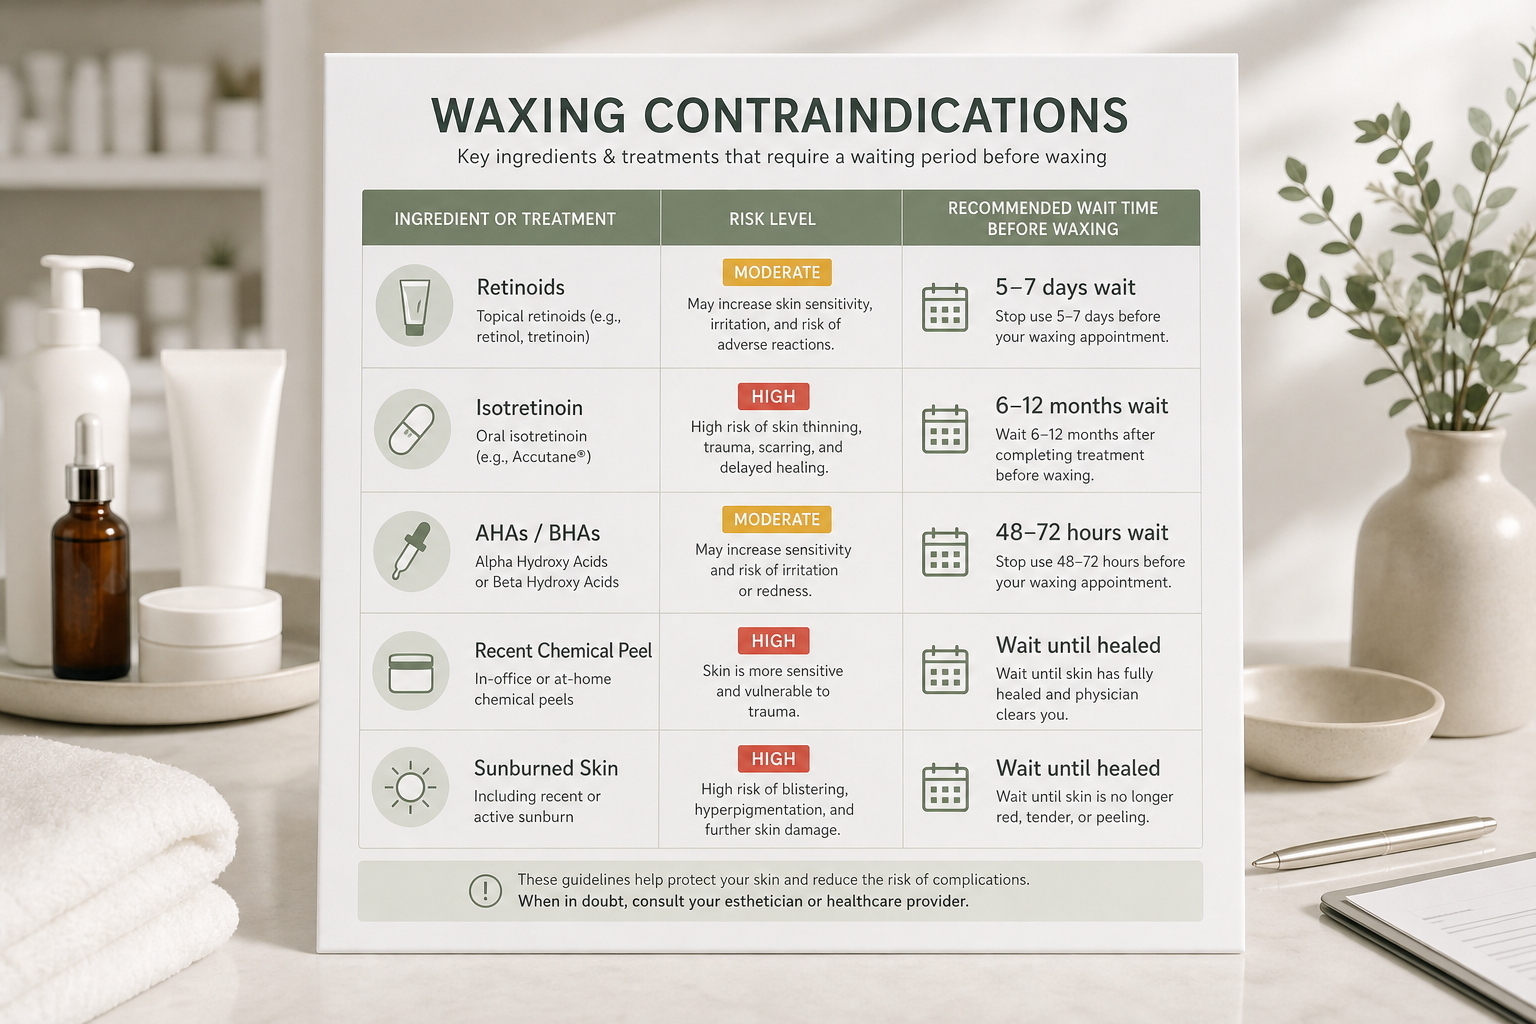
Alpha-hydroxy acids (AHAs) such as glycolic and lactic acid, and beta-hydroxy acids (BHAs) such as salicylic acid, exfoliate the skin surface and reduce its thickness. Regular use of these actives — particularly at higher concentrations — increases skin sensitivity and the risk of waxing injury. Pausing AHA and BHA use for at least 48 to 72 hours before waxing is advisable. Recent chemical peels or microdermabrasion treatments are also contraindications for waxing until the skin has fully recovered.
Sunburned, windburned, or otherwise already-irritated skin should never be waxed. The inflammatory state of the skin makes it far more vulnerable to both thermal and mechanical injury.
When to See a Doctor
Most superficial wax burns and minor skin lifting injuries can be managed safely at home with appropriate first aid and aftercare. However, certain situations require professional medical assessment rather than home treatment alone.
- The burn has produced blisters or a weeping, raw wound surface.
- The affected area is larger than the palm of your hand.
- The burn is on the face near the eyes, on the genitals, or over a joint.
- There are signs of infection: increasing redness spreading beyond the wound edge, warmth, swelling, pus, or fever.
- The burn has not shown meaningful improvement after one to two weeks of appropriate home care.
- You are immunocompromised, diabetic, or have a condition that affects wound healing.
- You are concerned about scarring or persistent dark marks that are not fading.
A general practitioner can assess the wound, prescribe topical antibiotics if infection is present, and refer you to a dermatologist if PIH or scarring requires specialist management.
How to Prevent Wax Burns
Prevention is considerably easier than treatment. The following measures reduce the risk of a wax burn or skin lifting injury significantly, whether waxing is performed at home or in a professional setting.
- Patch test before full application: Apply a small amount of wax to a discreet area and wait 24 hours to assess skin sensitivity before proceeding with a full treatment.
- Test wax temperature on your inner wrist: The wax should feel warm but not uncomfortable. If it stings on the wrist, it is too hot for more sensitive areas.
- Choose hard wax for sensitive or delicate areas: Hard wax vs. soft wax is a meaningful distinction for burn risk. Hard wax adheres to the hair rather than the skin and is generally better tolerated on the face, bikini area, and underarms. Soft wax strips cover larger areas efficiently but carry a higher risk of skin lifting if used incorrectly or on sensitive skin.
- Never double-pass with soft wax: Applying a soft wax strip over the same area twice removes the protective layer of skin cells that the first pass left intact, dramatically increasing the risk of epidermal avulsion.
- Pause retinoids and exfoliating acids before waxing: As outlined in the contraindications section, these products increase skin fragility and should be paused in advance.
- Ensure skin is clean and dry on the day of waxing: Oils, lotions, and sweat reduce wax adhesion and can cause uneven application, increasing the risk of the wax being applied too thickly or at an incorrect angle.
- Hold the skin taut during strip removal: Pulling the strip parallel to the skin surface and against the direction of hair growth, while holding the skin firm with the other hand, reduces the mechanical stress on the epidermis.
- Exfoliate 24 to 48 hours before waxing: Gentle exfoliation before the appointment helps lift dead skin cells and reduces the likelihood of ingrown hairs, but should not be performed on the day of waxing.
When Can You Wax Again After a Burn?
This is one of the most common questions after a waxing injury, and it rarely receives a clear answer. The short answer is: not until the skin has fully healed. For a minor first-degree burn or superficial skin lifting injury, this typically means waiting a minimum of two to three weeks. For a more significant injury involving blistering or a larger area of skin lifting, waiting four to six weeks — or until a dermatologist confirms the skin has recovered — is more appropriate.
Returning to waxing before the skin has fully re-epithelialized risks reopening the wound, introducing infection, and significantly worsening any PIH that is already developing. When you do return to waxing, consider switching to hard wax for the affected area, conducting a patch test, and reviewing whether any medications or topical products contributed to the original injury.
Frequently Asked Questions
How long does a wax burn take to heal?
A superficial first-degree wax burn typically heals within three to seven days. Skin lifting injuries may take five to ten days for the surface to close. Second-degree burns with blistering can take two to four weeks and may benefit from medical supervision. Any dark marks left behind — post-inflammatory hyperpigmentation — can take three to six months to fade, even after the wound itself has healed.
Can I put makeup over a wax burn?
No, not while the skin is broken, raw, or actively healing. Applying makeup over an open or healing wax burn introduces bacteria, occludes the wound, and can cause contact irritation. Once the skin surface has fully closed and is no longer sensitive — usually after one to two weeks for a minor burn — makeup can be reintroduced gradually, starting with mineral-based products that are less likely to irritate.
Will wax burn marks fade on their own?
Mild post-inflammatory hyperpigmentation from a superficial wax burn often fades naturally over three to six months, provided the area is consistently protected from sun exposure. Without sun protection, UV radiation can deepen the pigmentation and significantly extend the time it takes to fade. Darker skin tones are at higher risk of persistent marks and may benefit from earlier dermatological advice.
Is aloe vera good for wax burns?
Pure aloe vera gel is a well-supported option for soothing superficial wax burns. It has anti-inflammatory properties and can help reduce discomfort and redness in the early stages of healing. Use a product that is 100% aloe vera without added fragrance, alcohol, or colorants, as these additives can irritate damaged skin. Aloe vera is most appropriate for intact or mildly irritated skin; for raw or broken skin, a fragrance-free barrier ointment may be more protective.
What is the difference between a wax burn and normal post-wax redness?
Normal post-wax redness is a uniform pink flush that typically resolves within 30 minutes to a few hours. It does not involve broken skin, blistering, or significant pain beyond mild sensitivity. A wax burn, by contrast, involves persistent redness, stinging, skin that feels raw or looks shiny, or visible damage to the skin surface. If redness has not settled within a few hours, or if the skin looks or feels damaged, treat it as a burn rather than normal irritation.
Should I pop a blister from a wax burn?
No. Blisters form as a protective response, with the fluid inside helping to cushion and protect the healing tissue underneath. Popping a blister removes this protection, introduces bacteria, and significantly increases the risk of infection and scarring. If a blister is very large, painful, or in an area subject to repeated friction, a medical professional can drain it safely under sterile conditions.
Making Informed Decisions About Waxing After a Burn
A wax burn is an unpleasant experience, but most superficial injuries heal well with prompt, appropriate care. The key steps — cooling the skin, removing wax residue gently, applying a suitable soothing agent, protecting the area, and avoiding the many products that can make things worse — are straightforward once you understand the reasoning behind them. The more significant challenge for many people is managing the aftermath: the peeling, the temptation to pick, and the dark marks that can linger for months.
If you have experienced a wax burn, particularly one involving blistering, a large area, or persistent pigmentation, a consultation with a dermatologist or aesthetic medicine practitioner can help you understand your options for supporting healing and addressing any lasting marks. For those who find that waxing consistently causes skin sensitivity or injury, it is also worth discussing alternative hair removal methods — such as laser hair removal or intense pulsed light (IPL) — which may offer a more controlled and predictable outcome for certain skin types and areas. A qualified practitioner can assess your skin type, medical history, and hair removal goals to help you find the safest and most effective long-term approach.
