
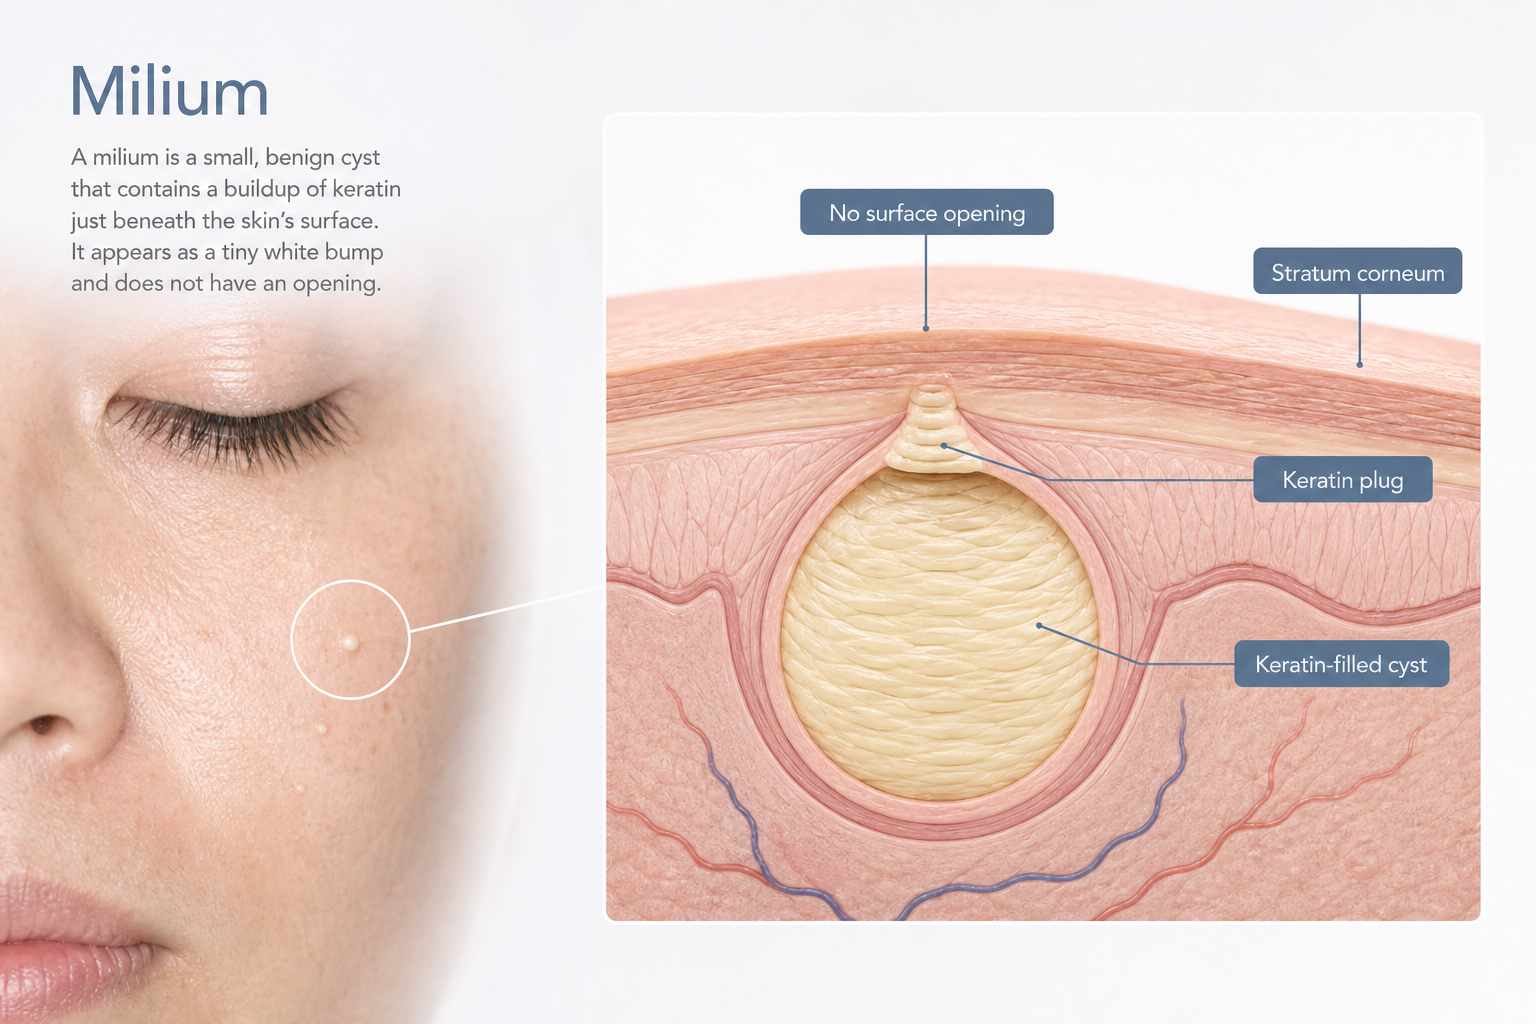

Milia are small, keratin-filled cysts that sit just beneath the surface of the skin with no surface opening, which is exactly why squeezing them like a pimple never works. Many people consider using a needle at home to release the trapped keratin, and while the basic principle behind this approach mirrors what a dermatologist or trained aesthetician does in clinic, the gap between knowing the concept and executing it safely is significant. This article explains how the needle method works, what the correct technique involves, where the real risks lie, and when professional removal is the more sensible choice.
Key Takeaways
- Milia are keratin-filled cysts with no pore opening, so they cannot be popped — a small incision is required to release the contents.
- At-home needle removal carries genuine risks including infection, scarring, and hyperpigmentation, particularly when technique or sterilization is inadequate.
- Needle gauge, insertion angle, and the distinction between the lever and incision technique all affect whether removal is clean or damaging.
- Milia near the eyelid margin, milia that are flat or hyperkeratotic, and any bump you are not certain is a milium should not be treated at home.
- Professional deroofing, cryotherapy, laser ablation, and topical retinoids are all effective alternatives with a better safety profile.
What Milia Are and Why They Behave Differently from Spots
A milium (the singular of milia) is a benign, dome-shaped bump measuring roughly 1–2 mm, typically white or pale yellow in colour. It forms when keratin protein becomes trapped within a small pocket beneath the stratum corneum — the outermost layer of the epidermis. Unlike a whitehead or comedone, a milium has no pore or follicular opening connecting it to the skin surface. This structural difference is the reason that squeezing, picking, or applying acne products has no effect: there is simply no channel through which the keratin plug can escape.
Primary milia arise spontaneously from keratin buildup within vellus hair follicles or sweat gland ducts, often without any identifiable trigger. Secondary milia develop after skin trauma — burns, blistering rashes, dermabrasion, or prolonged use of heavy occlusive creams and corticosteroid preparations. Neonatal milia, which appear in roughly 40–50% of newborns, typically resolve on their own within a few weeks and require no intervention. The milia most adults want to remove are primary or secondary milia that have persisted for months, most commonly around the eyes, cheeks, and nose.
Can You Remove Milia at Home with a Needle?
The short answer is that it is physically possible, but it is not without meaningful risk. The same basic manual extraction technique used in clinic — creating a tiny incision over the apex of the milium and expressing the keratin pearl — can in principle be performed at home. However, professional removal benefits from clinical-grade sterilization, precise instruments, adequate lighting, magnification, and trained hands that know when to stop. At home, none of those conditions are reliably present. That does not mean every attempt ends badly, but it does mean the margin for error is considerably narrower than most online guides suggest.
It is also worth noting that sterilizing a needle is not the same as having the correct technique. Many people who experience scarring or infection after home removal did sterilize their needle — the problem was insertion angle, excessive force, or attempting removal on a bump that was not actually a milium. Before attempting anything, it is worth being confident in the diagnosis. If the bump is inflamed, painful, growing, or located on the eyelid margin, do not attempt home removal.
Needle Selection and Sterilization: What Actually Matters
The choice of needle affects how cleanly the incision is made. A sterile lancet from a pharmacy — the type used for blood glucose testing — is the most practical option for home use because it comes individually packaged and pre-sterilized to a clinical standard. A fine-gauge needle such as a 25G, 27G, or 30G hypodermic needle is also appropriate; finer gauges (higher numbers) create a smaller, more precise nick. A sewing needle is a less suitable choice: it is thicker, not designed for skin penetration, and requires more aggressive sterilization.
If you are using a needle rather than a pre-packaged lancet, sterilization should involve two steps. First, pass the tip through a flame until it glows briefly, then allow it to cool completely — do not wipe it immediately, as this can recontaminate the tip. Second, wipe the cooled needle with a fresh alcohol swab or chlorhexidine solution. Rubbing alcohol (isopropyl alcohol at 70% or above) is effective; TCP or similar antiseptic solutions are acceptable alternatives. Chlorhexidine is preferred in clinical settings because it has residual antimicrobial activity, but 70% isopropyl alcohol is adequate for home use. The skin around the milium should also be cleaned with an antiseptic solution before any contact.
Step-by-Step: The Needle Technique for Milia Removal
The following steps describe the general approach used for manual extraction of a round, dome-shaped milium on the face (excluding the eyelid margin). This information is provided for educational purposes. If you are uncertain about the diagnosis, if the milium is on or very close to the eyelid, or if you have a history of keloid scarring or immunosuppression, seek professional removal instead.
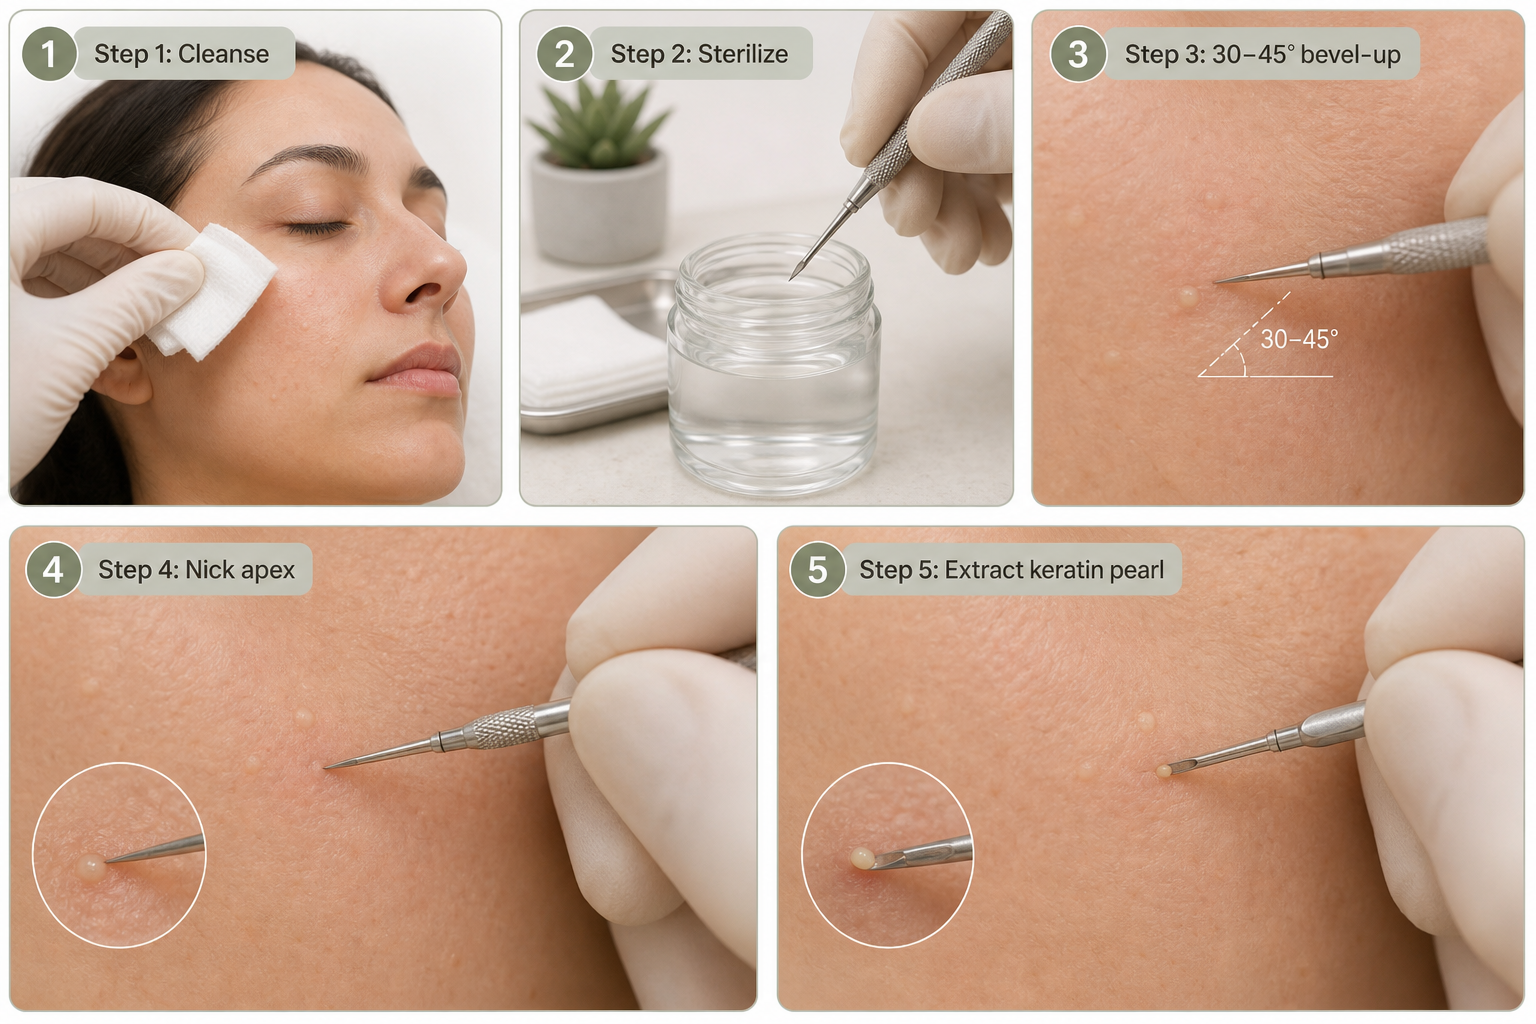
- Cleanse the skin thoroughly. Wash the area with a gentle cleanser and pat dry. Apply an antiseptic solution to the skin around the milium using a clean cotton pad or swab.
- Sterilize your instrument. Use a pre-packaged sterile lancet, or sterilize a fine-gauge needle using the flame-then-alcohol method described above. Allow the needle to cool before use.
- Position the needle correctly. Hold the needle almost parallel to the skin surface — at approximately 30 to 45 degrees — with the bevel (the angled cutting edge) facing upward. This bevel-up technique allows the tip to slide just beneath the surface of the milium rather than driving straight down into the dermis.
- Make a small nick over the apex. Using the very tip of the needle, make a tiny incision directly over the highest point of the milium. The goal is to pierce only the thin layer of skin covering the cyst — not to dig into the surrounding tissue. The incision should be minimal: just enough to create an opening in the cyst wall.
- Express the keratin pearl. Once the opening is made, you can attempt to express the contents using one of two approaches. The lever technique involves sliding the needle tip beneath the keratin ball and gently lifting it out through the opening — this works well when the milium is round and the incision is well-placed. Alternatively, a comedone extractor placed around the milium can apply gentle, even pressure to encourage the white bead to emerge. Do not squeeze with fingernails, as this increases the risk of tearing surrounding skin and driving bacteria into the wound.
- Stop if it does not release cleanly. If the keratin plug does not emerge with gentle pressure after the incision, do not force it. Applying excessive pressure risks pushing the cyst deeper, rupturing it beneath the skin surface, or causing a wound that is disproportionate to the original bump. In this situation, clean the area, apply an antiseptic, and consider professional removal.
- Apply antiseptic and leave the area alone. Once the milium has been extracted, clean the site again with an antiseptic solution. Do not apply makeup, heavy creams, or occlusive products to the area for at least 24 hours.
Two Techniques: Lever vs. Incision — Which Applies to You?
Most home-removal guides describe a single generic method, but there are two meaningfully different approaches, and understanding which applies to your situation reduces the risk of a poor outcome. The lever technique works best when the milium is round, sits close to the surface, and the keratin pearl is firm and well-defined. After making the nick, the needle tip is slid gently beneath the white bead and used to lever it upward and out through the opening, much like lifting a small ball from a socket. This approach minimizes the size of the wound and is less likely to cause bleeding.
The incision-and-expression technique is more appropriate when the milium sits slightly deeper or the keratin content is softer. Here, the incision is made, and a comedone extractor or very gentle fingertip pressure (never nails) is used to express the contents. This method carries a slightly higher risk of post-extraction redness and requires more precise pressure control to avoid damaging surrounding tissue.
It is also important to recognize that the needle method does not work on all milia. Flat or hyperkeratotic milia — where the keratin has spread laterally rather than forming a discrete round pearl — do not respond well to needle extraction. Attempting to extract flat milia with a needle typically results in skin damage without successful removal. These cases are better suited to professional treatments such as laser ablation or chemical peels.
Milia Near the Eyes: Why This Location Requires Extra Caution
The periorbital area — the skin around and immediately beneath the eyes — is one of the most common sites for milia, and also one of the highest-risk locations for home removal. The skin here is significantly thinner than elsewhere on the face, blood vessels are closer to the surface, and the proximity to the eye itself means that any slip of the needle carries consequences beyond a skin wound. Milia that sit on or very close to the eyelid margin are particularly problematic: the risk of inadvertent injury to the eye, eyelid, or the delicate structures of the lid margin is not theoretical.
Even for periorbital milia that are not on the lid margin itself, the thin skin in this area is more prone to bruising, scarring, and post-inflammatory hyperpigmentation following any trauma. If you are considering needle removal for milia around the eyes, professional treatment by a dermatologist or trained aesthetician is strongly advisable. In clinic, this area is typically treated under magnification with fine instruments and appropriate lighting — conditions that are difficult to replicate at home.
Risks of At-Home Milia Removal
Understanding the risks is not a formality — it is the most important factor in deciding whether home removal is appropriate for your situation. The risks below are real and documented, not theoretical worst-case scenarios.
- Infection: Even with sterilization, introducing a needle into the skin creates a portal for bacteria. Signs of infection include increasing redness, warmth, swelling, pus, or pain developing 24–48 hours after removal. If these appear, seek medical advice promptly.
- Permanent scarring: Excessive pressure, incorrect needle angle, or repeated attempts on the same site can damage the dermis and result in pitted or atrophic scars. Scarring risk is higher in people with a history of keloid formation.
- Hyperpigmentation: Post-inflammatory hyperpigmentation — darkening of the skin at the extraction site — is particularly common in medium and darker skin tones. It can persist for weeks to months and may be more noticeable than the original milium.
- Incorrect diagnosis: Not every small white bump is a milium. Syringomas, closed comedones, sebaceous hyperplasia, and even early basal cell carcinomas can resemble milia. Attempting needle extraction on the wrong lesion can delay appropriate diagnosis and cause unnecessary skin damage.
- Pushing the cyst deeper: If the incision is not well-placed or the keratin pearl is not fully released, pressure can rupture the cyst wall beneath the skin surface, triggering an inflammatory response that is harder to resolve than the original milium.
Professional Removal Options: What Clinics Offer
Professional milia removal is typically quick, well-tolerated, and associated with a lower risk of scarring and infection than home treatment. Understanding the available options helps you have a more informed conversation with a dermatologist or aesthetician.
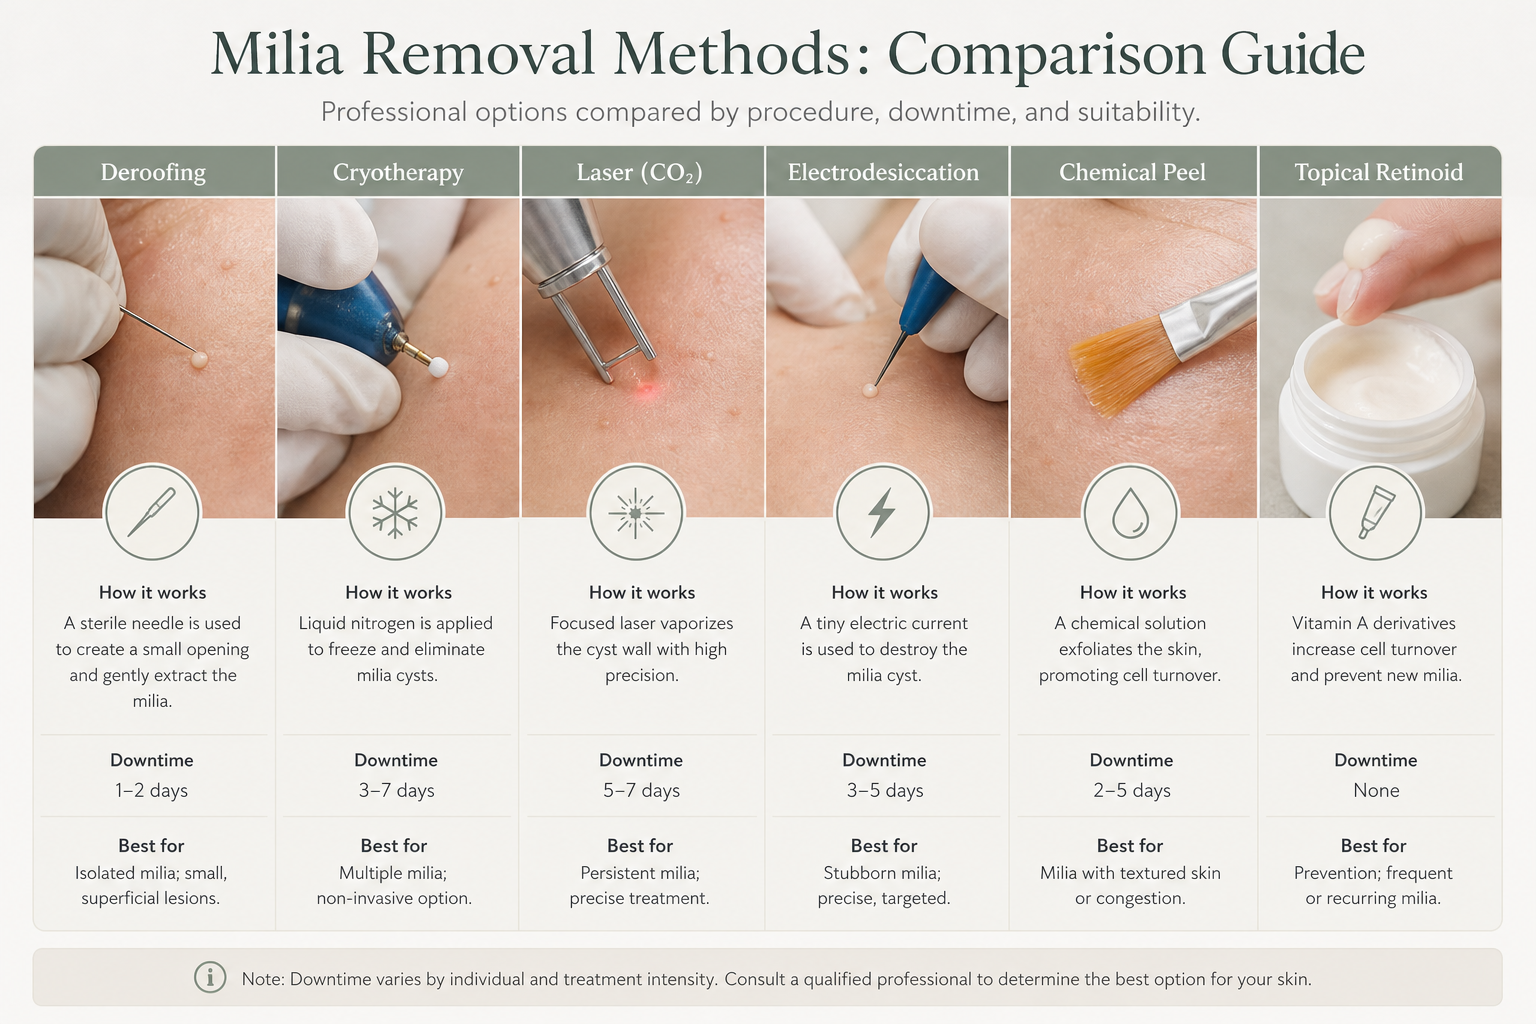
| Method | How It Works | Suitable For | Downtime | Notes |
|---|---|---|---|---|
| Deroofing (needle extraction) | Fine-gauge needle creates a tiny incision; keratin pearl is expressed with a comedone extractor | Individual round milia; any location including periorbital | 24–48 hours redness | Standard in-office procedure; fast and precise |
| Cryotherapy | Liquid nitrogen freezes and destroys the cyst | Multiple milia; thicker skin areas | Several days; possible blistering | Higher hyperpigmentation risk in darker skin tones |
| Laser ablation (CO2 / Er:YAG) | Laser energy vaporizes the cyst wall and contents | Multiple milia; flat or hyperkeratotic milia | 3–7 days | Precise; suitable for periorbital area in experienced hands |
| Electrodesiccation | Electrical current desiccates the cyst | Individual milia; small clusters | 2–5 days | Requires skilled operator to avoid scarring |
| Chemical peels (AHA/BHA) | Exfoliating acids promote cell turnover and gradual keratin release | Superficial milia; prevention; multiple lesions | Minimal to moderate | Slower results; better for prevention than acute removal |
| Topical retinoid | Accelerates epidermal cell turnover, preventing keratin accumulation | Prevention; mild primary milia | None (initial irritation possible) | Weeks to months for effect; not suitable during pregnancy |
Post-Extraction Aftercare: A Day-by-Day Guide
Aftercare following milia removal — whether at home or in clinic — significantly influences how well the skin heals and whether hyperpigmentation or scarring develops. The following timeline reflects what is generally appropriate after a straightforward needle extraction.
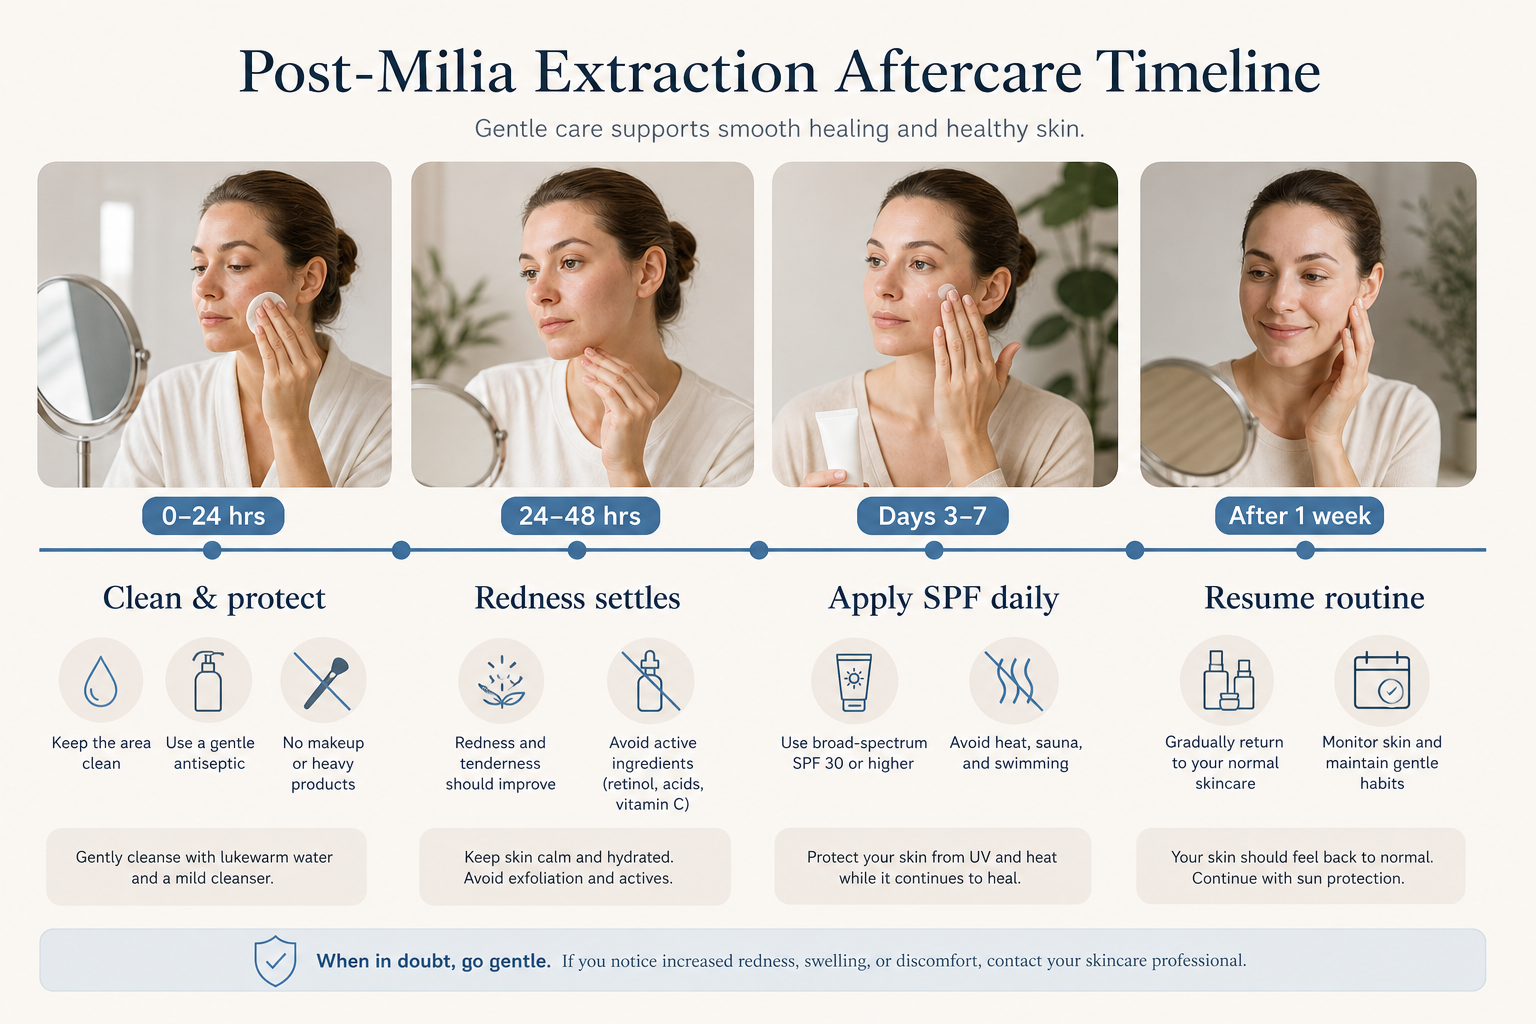
First 24 hours: Keep the extraction site clean and dry. Apply a thin layer of antiseptic ointment or a plain petrolatum-based product (such as plain Vaseline) to protect the small wound. Avoid all makeup, active skincare ingredients, and occlusive creams on the treated area. Some redness and minor swelling at the site is normal and expected.
24–48 hours: Redness typically begins to settle. Continue gentle cleansing and avoid touching the area unnecessarily. Do not apply exfoliating acids, retinoids, or vitamin C serums to the site. If you have sensitive skin, mild redness may persist for up to three to five days — this is not a sign of infection on its own.
Days 3–7: The skin should be visibly healing. Avoid steam rooms, saunas, and swimming pools during this period, as heat and chlorinated water can irritate the healing skin and increase infection risk. Begin applying a broad-spectrum SPF daily to the area, even if you are indoors — UV exposure during healing increases the risk of post-inflammatory hyperpigmentation.
After one week: If healing is progressing normally, you can gradually reintroduce your usual skincare routine. Continue daily SPF use. If you notice persistent redness, a growing dark mark, or any sign of infection, seek professional advice rather than attempting further home treatment.
When Home Removal Is Not Appropriate
There are specific situations where attempting needle removal at home is inadvisable regardless of technique or sterilization. These include: milia on or immediately adjacent to the eyelid margin; any bump you are not confident is a milium; milia that are flat or hyperkeratotic rather than dome-shaped; skin that is actively infected, inflamed, or broken nearby; a personal history of keloid or hypertrophic scarring; immunocompromised skin (for example, due to medication or a systemic condition); and milia in children, where professional assessment is always preferable.
How to Prevent Milia from Returning
Milia recurrence is common, particularly in people who use heavy occlusive moisturizers or who have sun-damaged skin. Preventing new milia from forming is more straightforward than removing existing ones. Regular gentle exfoliation with glycolic acid or other AHA-based products helps maintain cell turnover and reduces the likelihood of keratin becoming trapped. A topical retinoid used consistently over several months is one of the most evidence-supported approaches for both treating superficial primary milia and preventing recurrence, though it requires patience and is not suitable during pregnancy or breastfeeding. Avoiding heavy creams and occlusive ointments around the eye area, and using daily SPF to limit sun damage, also reduces the conditions that favour milia formation.
Frequently Asked Questions
Does removing milia with a needle hurt?
The sensation is typically described as a brief, sharp sting at the moment of the nick, followed by mild pressure during extraction. Most people find it tolerable without any anaesthetic. In clinic, a topical numbing cream is sometimes applied for sensitive areas, particularly around the eyes.
Will milia come back after needle removal?
Removing an individual milium does not prevent new ones from forming. If the underlying cause — such as heavy skincare products, sun damage, or slow cell turnover — is not addressed, recurrence is likely. Incorporating a topical retinoid or regular AHA exfoliation into your routine can help reduce the frequency of new milia.
How do I know if a bump is a milium and not something else?
A milium is typically 1–2 mm, dome-shaped, pearly white or pale yellow, firm to the touch, and does not change with pressure. It has no surrounding redness or inflammation. If the bump is larger than 3 mm, growing, inflamed, painful, or located on the eyelid margin, it should be assessed by a dermatologist before any attempt at removal.
Can I use a comedone extractor without making an incision first?
No. Because a milium has no surface opening, a comedone extractor alone cannot express the contents. An incision must be made first to create an opening in the cyst wall. Applying a comedone extractor to an intact milium without a prior nick will cause skin trauma without releasing the keratin plug.
How long does redness last after milia extraction?
For most people, redness at the extraction site settles within 24 to 48 hours. Those with sensitive skin may notice mild redness for up to three to five days. Persistent redness beyond a week, or redness accompanied by warmth, swelling, or discharge, warrants professional assessment.
Is professional milia removal expensive?
Cost varies considerably depending on the clinic, the number of milia being treated, and the method used. Needle deroofing of a small number of milia is generally one of the more affordable in-clinic procedures. Laser ablation and cryotherapy tend to cost more, particularly for multiple lesions. A consultation with a dermatologist or aesthetician will give you an accurate estimate for your specific situation.
Home Removal or Professional Treatment: Making the Right Decision for Your Skin
Needle removal of milia at home is not inherently reckless, but it is also not as straightforward as many online guides imply. The technique — bevel-up insertion at 30–45 degrees, a minimal nick over the apex, and gentle lever or expression of the keratin pearl — is learnable, but it requires the right instrument, proper sterilization, good lighting, and the discipline to stop if the milium does not release cleanly. The risks of infection, scarring, and hyperpigmentation are real, and they are meaningfully higher when technique is imprecise or the diagnosis is uncertain.
For milia that are round, dome-shaped, clearly identified, and located away from the eyelid margin, a careful home attempt using a sterile lancet and the steps outlined above is something many adults manage without complication. For milia near the eyes, flat or persistent milia, or any situation where you are not confident in the diagnosis, professional deroofing by a dermatologist or trained aesthetician offers a faster, safer, and more reliable outcome. If milia keep returning, addressing the underlying cause — through retinoids, AHA exfoliation, and appropriate sun protection — is ultimately more effective than repeated removal of individual lesions.
