
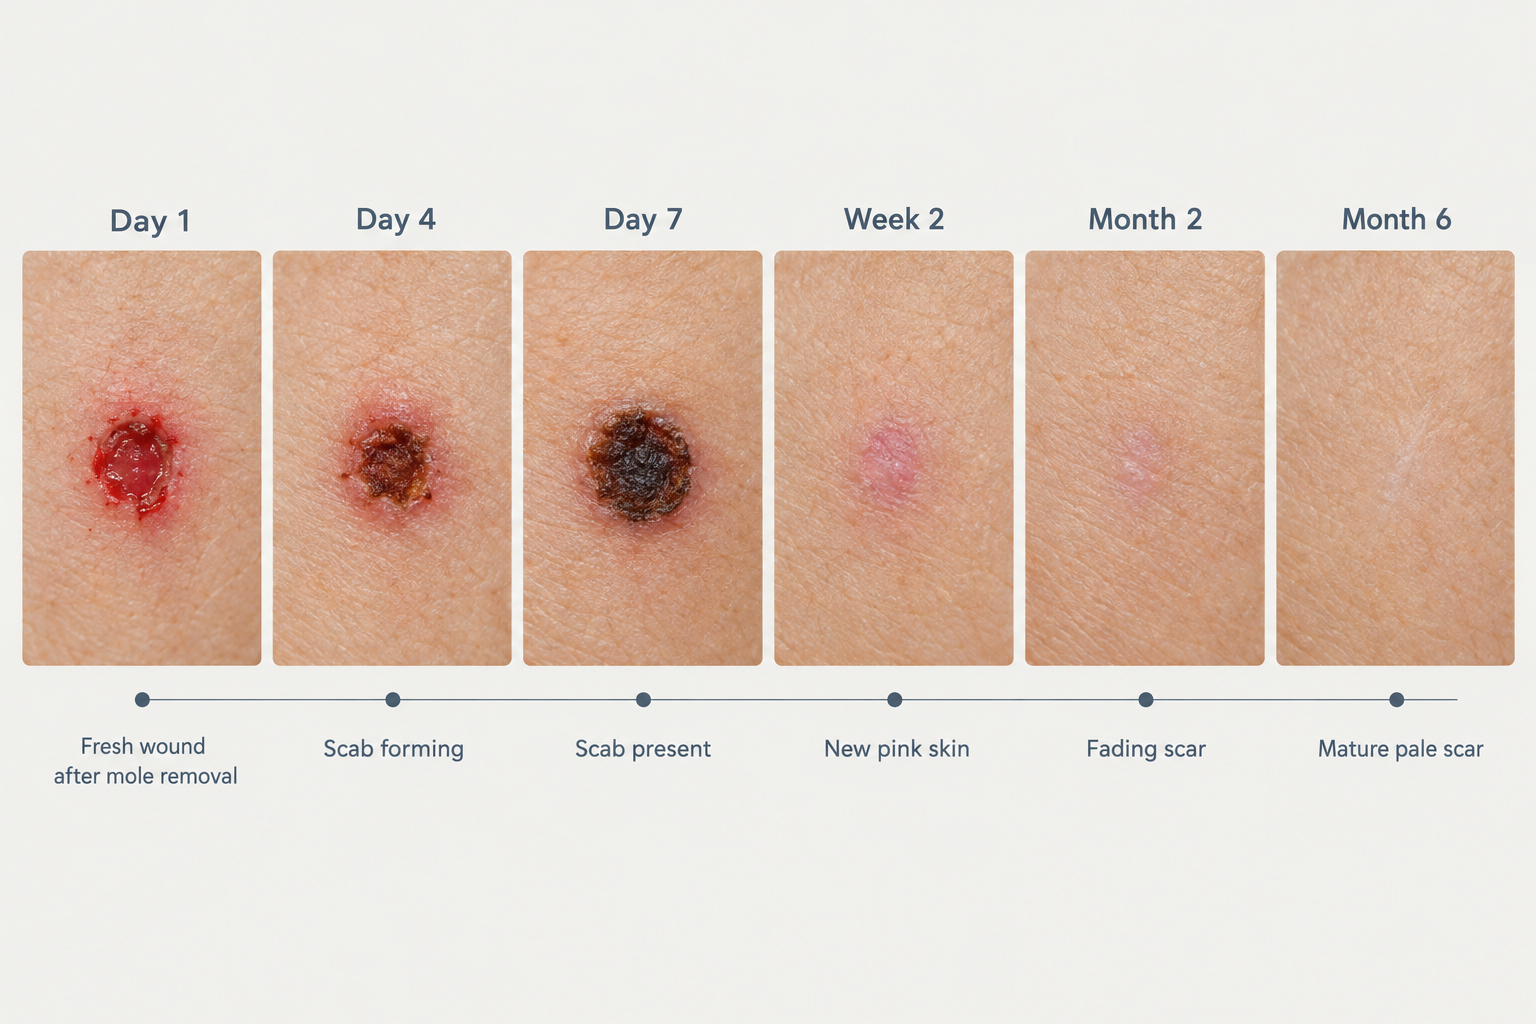

After mole removal, most patients want to know exactly what their skin should look like at each stage of recovery. Healing follows a broadly predictable sequence, but the timeline and appearance can vary depending on the removal method used, the size and depth of the mole, and individual skin characteristics. This guide walks through the week-by-week healing stages, explains what is normal at each point, and highlights signs that may warrant a follow-up with your practitioner.
Key Takeaways
- Mole removal healing typically progresses through four overlapping phases: haemostasis, inflammation, proliferation, and remodelling — each with distinct visible changes.
- Scabbing, redness, and mild swelling in the first one to two weeks are normal parts of the healing process, not signs of a problem.
- The method of removal — shave excision, surgical excision, or laser — significantly influences how the wound looks and how long full healing takes.
- Scar appearance continues to improve for up to 12 to 18 months after the procedure; early results are not the final outcome.
- Protecting the healing site from sun exposure is one of the most important steps for minimising long-term pigmentation changes.
How Mole Removal Works and Why It Affects Healing
The healing process after mole removal is directly shaped by which technique was used. Understanding the method helps set realistic expectations for what the wound site will look like at each stage.
Shave excision involves using a small blade to shave the mole flush with or just below the skin surface. Because this technique does not penetrate deeply into the dermis, the resulting wound is relatively shallow. Healing tends to be faster, and stitches are not usually required. The trade-off is that deeper moles cannot always be fully removed this way, and there is a small possibility of regrowth if any cells remain beneath the surface.
Surgical excision cuts the mole out entirely, including a margin of surrounding tissue, and the wound is closed with sutures. This method is used when the mole is raised, large, or when the tissue needs to be sent for histological analysis. Because the incision goes deeper into the skin, the healing period is longer and a linear scar is more likely.
Laser removal uses targeted light energy to break down pigmented cells. It is generally suitable only for superficial, benign lesions and is not appropriate when a tissue sample is needed. Healing after laser treatment tends to involve less structural wound disruption, though redness and pigmentation changes can persist for several weeks.
The Four Biological Phases of Wound Healing
Regardless of the removal method, skin healing follows four overlapping biological phases. Recognising these phases helps patients understand why the wound looks different from one week to the next.
Haemostasis begins immediately after the procedure. Blood vessels constrict and a clot forms to stop bleeding. This is why the site may appear dark red or have a small crust within the first few hours.
Inflammation follows over the next several days. The area becomes red, slightly swollen, and may feel warm or tender. This is the immune system clearing debris and preparing the tissue for repair. Mild inflammation is a normal and necessary part of healing; it does not indicate infection on its own.
Proliferation is the rebuilding phase, typically spanning from around day four to several weeks. New collagen fibres are laid down, new blood vessels form, and the wound contracts and closes. During this phase, a scab or crust is usually present, and the surrounding skin may look pink.
Remodelling is the longest phase and can continue for 12 to 18 months. The collagen fibres reorganise, the scar gradually flattens and softens, and redness fades. The final appearance of the scar is not visible until this phase is well advanced.
Week-by-Week Healing Stages After Mole Removal
Days 1 to 3: Immediate Post-Procedure Appearance
In the first 24 to 72 hours after mole removal, the wound site will typically appear red, slightly raised, and may have a small amount of dried blood or a thin crust forming at the surface. If sutures were placed following surgical excision, the stitches will be visible and the surrounding skin may be bruised or swollen, particularly on the face where tissue is more vascular.
Some clear or slightly yellow fluid seeping from the wound during this period is normal — this is serous fluid, part of the body's natural healing response. A small amount of bleeding immediately after the procedure is also expected. Patients are usually advised to keep the area clean and covered with a non-stick dressing, and to avoid getting the site wet for the first day or two unless instructed otherwise by their practitioner.
Pain at this stage is typically mild and manageable with over-the-counter pain relief if needed. Significant throbbing pain, rapidly spreading redness, or warmth extending well beyond the wound edge should be reported to the treating clinic promptly.
Days 4 to 7: Scab Formation and Early Closure
By the end of the first week, a scab or crust will have formed over most wound types. This scab is made up of dried serum, fibrin, and dead cells, and it acts as a natural protective barrier while new skin forms underneath. The scab may appear dark brown, dark red, or even black depending on the depth of the wound and the individual's skin tone — this colouring is normal and does not indicate a problem.
The surrounding skin may still look pink or slightly inflamed. For shave excisions, the wound is often partially or fully covered by a scab at this point and may already be beginning to flatten. For surgical excisions with sutures, the wound edges should be approximated and the stitches intact. Sutures placed on the face are often removed between five and seven days; those on the body may remain for seven to fourteen days depending on the location and depth.
One of the most important instructions during this phase is to avoid picking or scratching the scab. Removing the scab prematurely disrupts the new tissue forming underneath, increases the risk of scarring, and can introduce bacteria into the wound.
Week 2: Scab Shedding and New Skin Emergence
During the second week, the scab typically begins to loosen and shed naturally as the new epithelial layer forms beneath it. The skin revealed underneath will often appear pink, smooth, and slightly shiny — this is immature new skin and is more sensitive than the surrounding tissue. It may also look slightly indented or raised compared to the surrounding skin, which is normal at this stage.
For shave excisions, the site may look almost healed on the surface by the end of week two, though the underlying tissue is still remodelling. For deeper surgical excisions, the wound may still appear noticeably pink with a visible linear scar where the incision was made. Any sutures that have not already been removed will typically be taken out during this period.
Sun protection becomes especially important from this point. The new skin forming over the wound site contains less melanin than the surrounding skin and is highly susceptible to UV-induced pigmentation changes. Applying a broad-spectrum SPF 30 or higher sunscreen — or keeping the area covered — can significantly reduce the risk of post-inflammatory hyperpigmentation, which can make the scar appear darker than the surrounding skin for months.
Weeks 3 to 4: Surface Healing and Early Scar Formation
By weeks three and four, the surface of the wound is usually fully closed for most shave excisions and many surgical excisions. The area may still appear pink or red, and the texture may differ slightly from the surrounding skin. A flat, slightly discoloured mark is common at this stage and does not represent the final outcome.
Some patients notice that the scar appears raised or firm during this period. This is because collagen production is still active and the fibres have not yet reorganised into their final alignment. A firm, slightly raised scar at four weeks is not necessarily a hypertrophic scar — it is often a normal part of the proliferative phase and will typically soften over the following months.
Itching around the healing site is common during weeks three and four and usually reflects nerve regeneration and tissue remodelling rather than infection. Gentle moisturising of the area can help manage discomfort, though patients should confirm with their practitioner which products are appropriate for the healing site.
Weeks 5 to 8: Continued Remodelling and Colour Change
Between weeks five and eight, the scar continues to mature. Redness typically begins to fade during this period, and the scar may start to flatten if it was raised in earlier weeks. The colour of the scar at this stage can range from pink to red to purple, depending on skin tone and the depth of the original wound. In patients with darker skin tones, post-inflammatory hyperpigmentation — a darkening of the scar relative to the surrounding skin — may become more noticeable during this phase.
Patients who had surgical excision may notice that the linear scar is becoming less prominent, though it will still be visible. The texture of the scar should be softening gradually. If the scar appears to be growing, becoming increasingly raised, or extending beyond the original wound boundary, this may indicate hypertrophic scarring or, less commonly, keloid formation. Both warrant assessment by a qualified practitioner, as early intervention tends to produce better outcomes.
Months 3 to 6: Significant Fading and Flattening
By three to six months post-procedure, most patients see meaningful improvement in scar appearance. Redness continues to fade, the scar flattens further, and the texture becomes closer to the surrounding skin. For many patients with lighter skin tones and smaller moles removed by shave excision, the mark may be barely noticeable at this stage.
Post-inflammatory hyperpigmentation, if present, may begin to fade during this period, particularly with consistent sun protection. Silicone-based scar gels or sheets are sometimes recommended by practitioners during this phase to support collagen remodelling and reduce redness, though patients should follow their individual aftercare guidance rather than self-prescribing.
Months 6 to 18: Final Scar Maturation
The remodelling phase continues well beyond what most patients expect. Scar maturation can take up to 12 to 18 months, and the appearance at six months is not the final result. During this period, the scar typically becomes paler, softer, and flatter. In many cases, the final mark is a small, flat, pale line or patch that is minimally noticeable in everyday life.
Patients who are concerned about residual scarring after six months may wish to discuss options with a dermatologist or aesthetic practitioner. Treatments that may be considered for mature scars include topical retinoids, chemical peels, microneedling, fractional laser resurfacing, or steroid injections for raised scars — though suitability depends on the individual, the scar type, and clinical assessment.
What Normal Healing Looks Like Versus Signs of Concern
Understanding the difference between expected healing and a potential complication helps patients know when to seek advice without unnecessary anxiety.
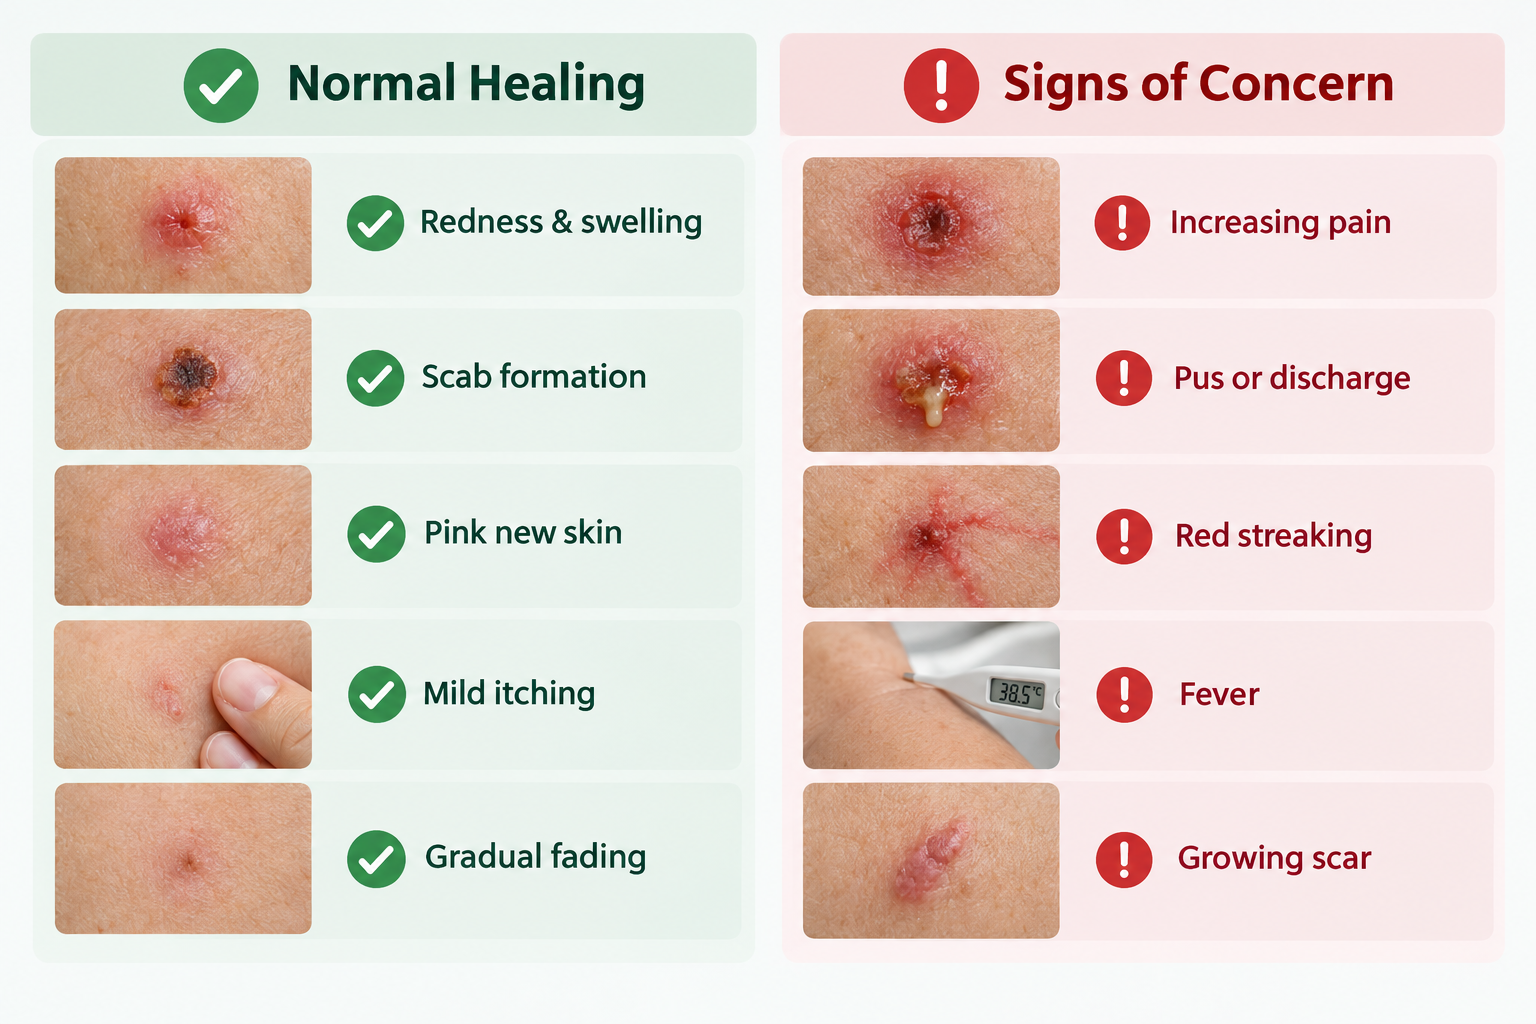
Normal healing signs include: redness and mild swelling in the first week; a dark scab forming and remaining for one to two weeks; pink or shiny new skin after the scab sheds; mild itching during weeks three to four; a firm or slightly raised scar in the first month; gradual fading of redness over three to six months.
Signs that warrant prompt assessment include: increasing pain, warmth, or swelling after the first few days; pus or cloudy discharge from the wound; red streaking extending from the wound edge; fever; a scar that continues to grow beyond the original wound boundary; or any new pigmented lesion appearing at or near the removal site, which should always be evaluated by a qualified clinician.
Factors That Influence Healing Speed and Scar Outcome
Several individual and procedural factors affect how quickly the skin heals and what the final scar looks like. Age plays a role — younger skin tends to heal faster but may also produce more collagen, occasionally leading to slightly raised scars. Older skin heals more slowly but often produces flatter, less noticeable scars.
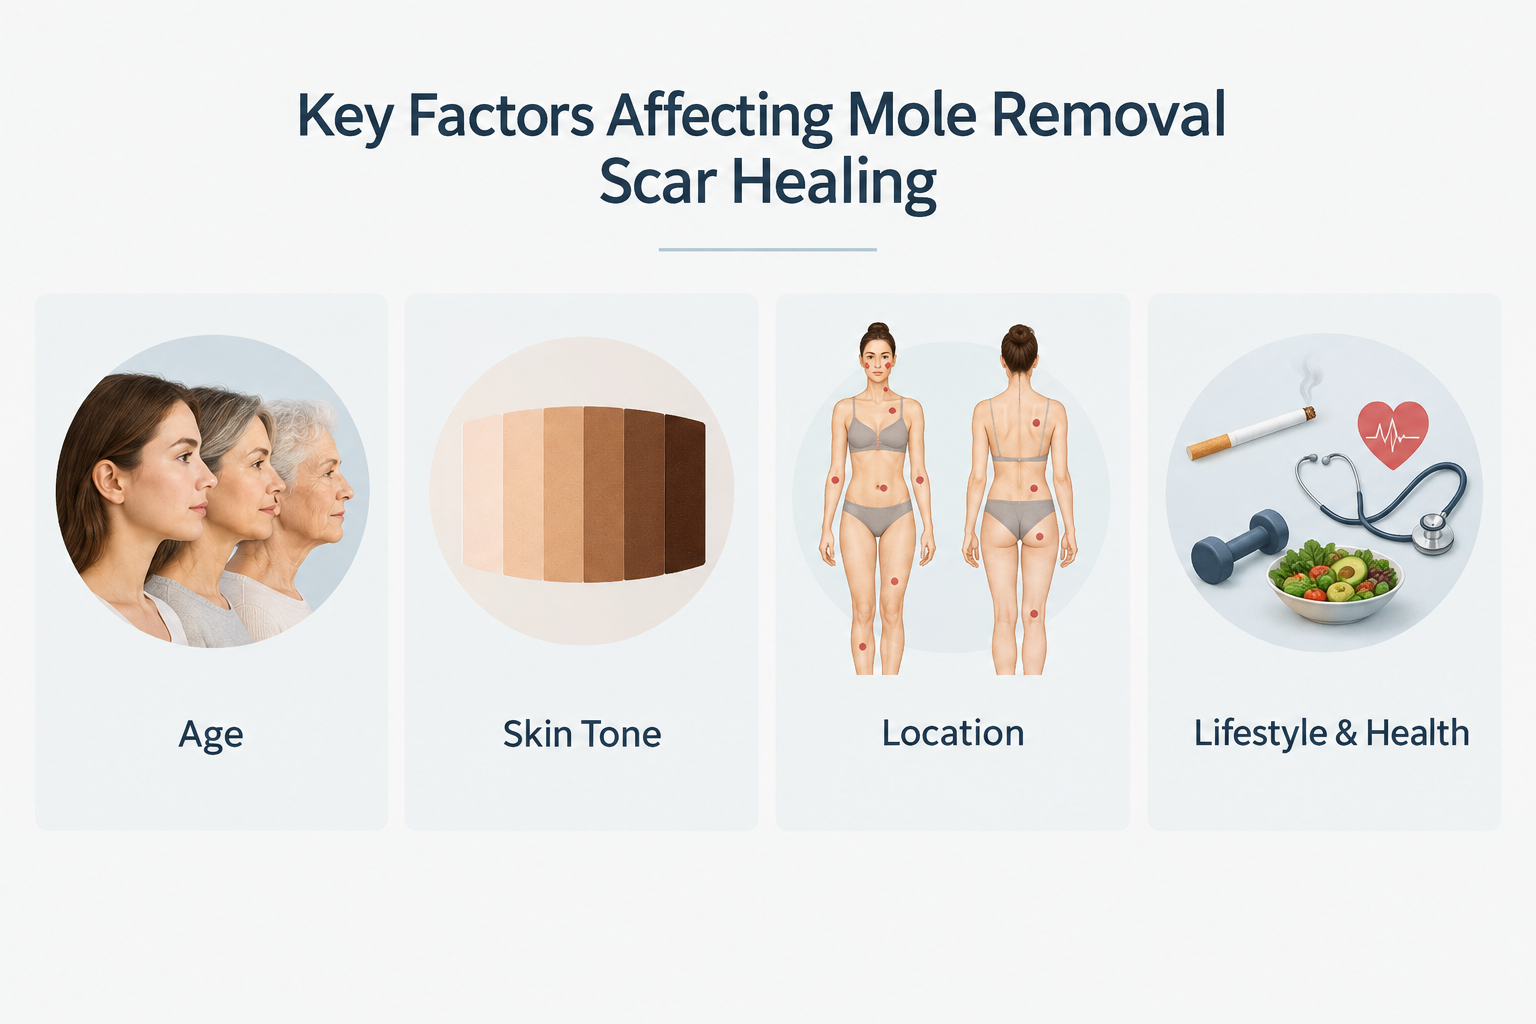
Skin tone is a significant factor. Patients with medium to darker skin tones have a higher baseline risk of post-inflammatory hyperpigmentation and, in some cases, keloid scarring. This does not mean mole removal is unsuitable for these patients, but it does mean that aftercare — particularly sun protection — is especially important, and that the choice of removal method should be discussed carefully with a practitioner experienced in treating diverse skin tones.
The location of the mole also matters. Areas under tension, such as the chest, shoulders, and upper back, are more prone to widened or raised scars because the skin is constantly being stretched by movement. The face, by contrast, tends to heal with finer scars due to its rich blood supply, though this also means more initial bruising and swelling.
Smoking, certain medications, and underlying health conditions such as diabetes can impair wound healing and should be disclosed to the treating practitioner before the procedure.
Aftercare Practices That Support Healing
Consistent aftercare has a meaningful impact on healing quality. The following practices are commonly recommended, though individual aftercare instructions from the treating clinic should always take precedence.
- Keep the wound clean and moist: A slightly moist wound environment supports faster epithelialisation. Petroleum jelly or a practitioner-recommended ointment applied under a non-stick dressing is often advised in the early days.
- Avoid picking the scab: Premature scab removal disrupts healing and increases scarring risk.
- Protect from sun exposure: UV radiation can permanently darken a healing scar. Use SPF 30 or higher on the area once the surface is closed, and continue for at least six months.
- Avoid strenuous activity: For surgical excisions, avoiding exercise that stretches or strains the wound area for one to two weeks reduces the risk of wound dehiscence (reopening).
- Follow suture care instructions: Keep sutured wounds dry as directed and attend the scheduled suture removal appointment.
- Moisturise the scar: Once the wound is fully closed, gentle massage with an unscented moisturiser or a practitioner-recommended scar product may help soften the scar tissue over time.
Frequently Asked Questions
How long does it take for a mole removal scar to fade completely?
The surface wound usually closes within one to three weeks depending on the method used. However, the scar continues to remodel for up to 12 to 18 months. Most patients see significant fading by three to six months, but the final appearance is not established until the remodelling phase is complete. Consistent sun protection throughout this period is one of the most effective ways to support fading.
Is it normal for the scar to look worse before it looks better?
Yes, this is common. During the proliferative phase — roughly weeks three to eight — the scar may appear raised, firm, or more red than it did in the first two weeks. This reflects active collagen production and does not necessarily mean the scar will remain that way. Gradual softening and fading typically follow as the remodelling phase progresses.
Can I wear makeup over the healing site?
Makeup should generally be avoided over an open or scabbed wound, as it can introduce bacteria and interfere with healing. Once the surface is fully closed and the scab has shed naturally, mineral-based makeup is often tolerated, but patients should confirm this with their practitioner based on their specific wound and skin type.
What should I do if my scar becomes raised or itchy months after the procedure?
A scar that becomes increasingly raised, itchy, or extends beyond the original wound boundary after the first few months may indicate hypertrophic scarring or keloid formation. Both are worth discussing with a dermatologist or aesthetic practitioner. Early treatment options such as silicone sheeting, corticosteroid injections, or laser therapy may be considered depending on the scar type and individual assessment.
Will the mole grow back after removal?
Complete removal of a benign mole by surgical excision with clear margins is unlikely to result in regrowth. Shave excision carries a small risk of partial regrowth if some cells remain beneath the surface. Any new pigmented lesion appearing at or near a previous removal site should be assessed by a qualified clinician rather than assumed to be benign regrowth.
Does the healing process differ for moles removed from the face versus the body?
Yes. Facial skin has a richer blood supply, which supports faster healing and often produces finer scars, but also causes more initial bruising and swelling. Body sites — particularly the chest, back, and shoulders — are under more mechanical tension and tend to produce wider or more raised scars. Aftercare and realistic expectations should be tailored to the specific location.
When to Discuss Your Healing Progress With a Practitioner
Mole removal healing is a gradual process, and the appearance of the wound site changes considerably from week to week. Most patients find that understanding what to expect at each stage reduces anxiety and helps them follow aftercare instructions more consistently. If the wound appears to be healing normally but you are unsure, a brief follow-up with the treating clinic is always reasonable — most practitioners welcome the opportunity to confirm that recovery is on track.
If you are considering mole removal and want to understand what the healing process would look like for your specific skin type, mole characteristics, and preferred removal method, a consultation with a qualified dermatologist or aesthetic practitioner is the appropriate starting point. They can assess the lesion, recommend the most suitable technique, and provide personalised aftercare guidance that accounts for your individual healing factors.
